Sunday, October 23, 2005
Newbies - Reading Your Knitting II
The Forest Path is within one triangle on the right side of having that border finished. That still leaves the left side, but usually second things go as well or faster, I find. Other than that, there's a charity hat that's mostly done, and the curret perpetual sock is midway up the leg of the second one.
To continue the Reading Your Knitting piece:
It can also be useful to do a patterned stitch row and examine it at the end of each row to see what it should look like. After a couple times through, you will automatically know what row to start with when you come back to the project.
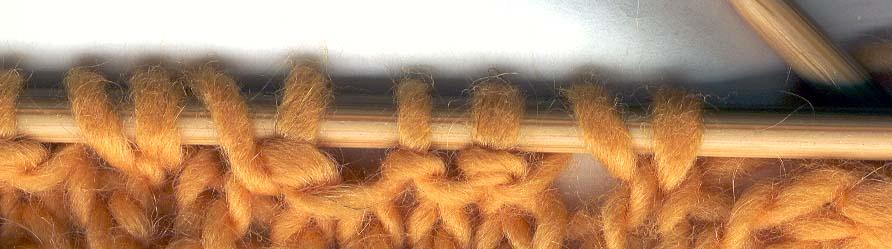
Below is a sample of a 4 round (knit in the round, but the even rows would be purled back if it were being done back and forth) lace pattern to practice seeing how each round looks when it’s completed.
Purl lace pattern
Round 1 -- *k1, yo, p2tog, p1, p2tog, yo, rep. from *.
Round 2 – k
Round 3 – k
Round 4 – k
At the end of round 1:
 At the end of round 2:
 Note the 2nd stitch from the right. In the first picture, it’s still a yarn over with a hole below it, but now you can see there is the hole below, stitch above that, then the stitch on the needle.
At the end of round 3:
 Now you see the hole, the stitch above that, the full looking stitch, and then the one on the needle
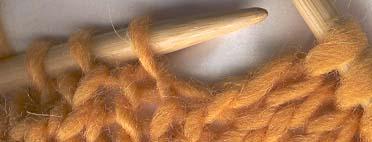
At the end of row 4:
 You can see the hole, and 3 stitches above it.

One thing that’s difficult to know is what row you are on, particularly when decreasing and cabling. Each time you knit a row, a line of yarn goes across. You can count the lines between the stitches to know how many rows you have finished. Most times decreases come every other row (or round). These pictures show a sequence of decrease and non-decrease rounds when making a sock:
The decrease on the right is a k2tog (knit 2 together), which leans to the right. Can you tell which picture had the decrease happen in the prior row, and which in the row before that? (hint, look for where the loops of the stitches pile up on top of each other.
This decrease on the left is an SSK (slip, slip, K2tog) which leans to the left. Which picture gets the decrease?
In each case, in the first picture you're looking at the decrease from the row before -- i.e., you did the decrease last row, and now you're coming back up on it again. In the s econd pictures, you're coming up on it the second time. So, if the instructions are to decrease in one round and then knit the next round plain, repeat until all decreases accomplished, and you need to know when to recognize that you did the decrease in the last round and now need to knit plain, or that you knit plain last time and it's time to decrease again.
To continue the Reading Your Knitting piece:
It can also be useful to do a patterned stitch row and examine it at the end of each row to see what it should look like. After a couple times through, you will automatically know what row to start with when you come back to the project.
Below is a sample of a 4 round (knit in the round, but the even rows would be purled back if it were being done back and forth) lace pattern to practice seeing how each round looks when it’s completed.
Purl lace pattern
Round 1 -- *k1, yo, p2tog, p1, p2tog, yo, rep. from *.
Round 2 – k
Round 3 – k
Round 4 – k
At the end of round 1:
 At the end of round 2:
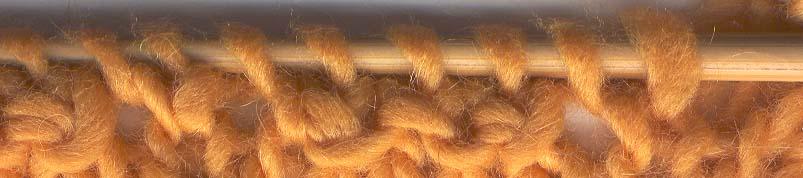 Note the 2nd stitch from the right. In the first picture, it’s still a yarn over with a hole below it, but now you can see there is the hole below, stitch above that, then the stitch on the needle.
At the end of round 3:
 Now you see the hole, the stitch above that, the full looking stitch, and then the one on the needle
At the end of row 4:
 You can see the hole, and 3 stitches above it.
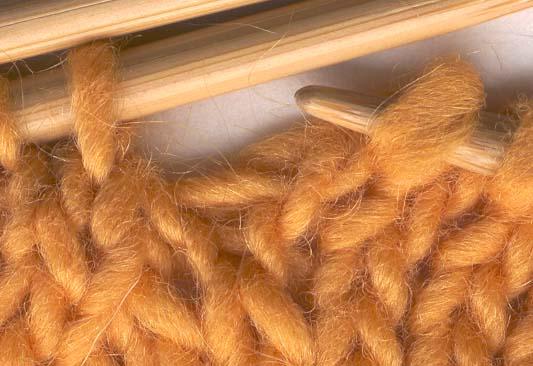
One thing that’s difficult to know is what row you are on, particularly when decreasing and cabling. Each time you knit a row, a line of yarn goes across. You can count the lines between the stitches to know how many rows you have finished. Most times decreases come every other row (or round). These pictures show a sequence of decrease and non-decrease rounds when making a sock:
The decrease on the right is a k2tog (knit 2 together), which leans to the right. Can you tell which
 picture had the decrease happen in the prior row, and which in the row before that? (hint, look for where the loops of the stitches pile up on top of each other.
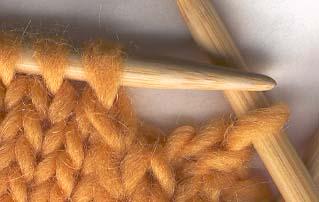
This decrease on the left is an SSK (slip, slip, K2tog) which leans to the left. Which picture gets the decrease?
In each case, in the first picture you're looking at the decrease from the row before -- i.e., you did the decrease last row, and now you're coming back up on it again. In the s
 econd pictures, you're coming up on it the second time. So, if the instructions are to decrease in one round and then knit the next round plain, repeat until all decreases accomplished, and you need to know when to recognize that you did the decrease in the last round and now need to knit plain, or that you knit plain last time and it's time to decrease again.
Comments:
<< Home
I find that really helpful. I'm looking forward to seeing the rest of the "reading your knitting" posts.
Post a Comment
# posted by  : 10:28 AM
: 10:28 AM << Home
![]()